How to add a stack light to your laser cutter
A red/green tower light on the machine tells everyone in the shop what the laser is doing — running, paused or done — without walking over to the screen. Here's how to build one that follows LightBurn, with an Arduino Uno and Beacon.
Updated November 4, 2026
What the light shows
Beacon reads LightBurn's status and sends it to the Arduino over USB about twice a second. The light then shows:
- Red — a job is running.
- Red and green together — the job is paused, so nobody mistakes it for finished.
- Green — the laser is ready (free).
- Green, blinking — framing, if you switch blinking on in Beacon (otherwise steady green).
- Red, slow blink — LightBurn has lost the laser, if blinking is on.
- Off — Beacon can't see LightBurn.
An optional buzzer beeps when a job finishes or pauses.
What you need
| Arduino Uno R3 or a clone, plus a USB cable that carries data | $10–25 |
|---|---|
| 12 or 24 V LED stack light, red and green, common positive (+) | $15–30 |
| Power supply matching the light (12 or 24 V DC) | $8–15 |
| ULN2003 or ULN2803 driver board | $2–4 |
| 5 V piezo buzzer (optional) | $1 |
| Total | ≈ $36–75 |
Prices are approximate. The Arduino can't power a 12/24 V light by itself: the ULN2003 board switches the light's colour wires to ground for it.
Wire it up
- Connect the light's common wire to the + of its power supply.
- Connect the light's red wire to OUT1 and its green wire to OUT2 on the ULN2003 board.
- Connect Arduino D10 to the driver's IN1 (red) and D9 to IN2 (green).
- Connect the power supply's −, the driver's ground and the Arduino's GND together.
- Optional buzzer: + to D8, − to GND. A toggle switch from D4 to GND turns it on and off.
D10 red light    D9  green light
D8  buzzer       D4  buzzer switch
GND shared ground with the light's supply
Put Beacon's program on the Arduino
You don't need the Arduino IDE. Beacon carries the program ready-made and uploads it itself:
- Install Beacon and plug the Uno into your computer.
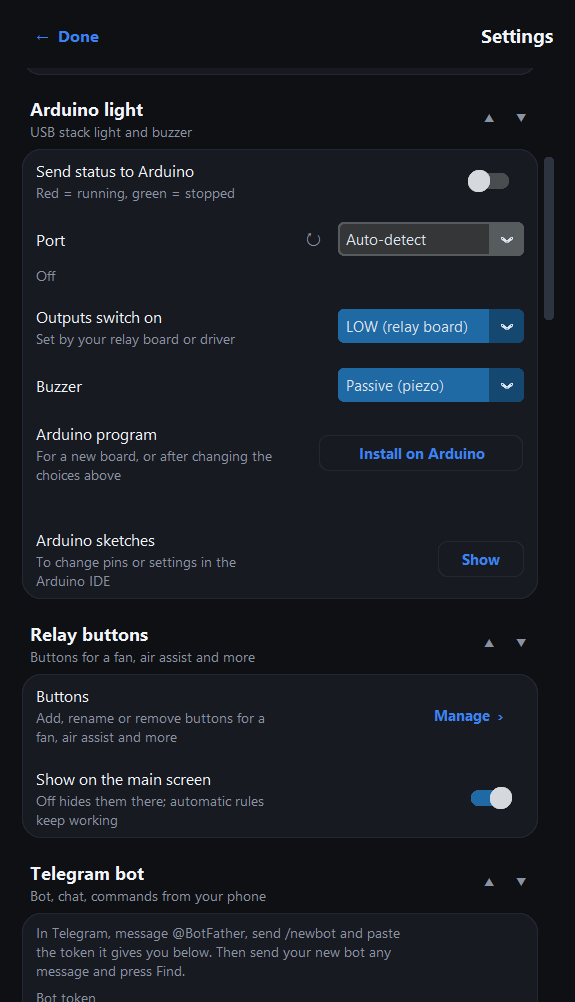
- In Beacon, open Settings › Arduino light.
- Set Outputs switch on to HIGH (ULN2003) for the driver board above. Choose LOW (relay board) only if you drive the light through a relay board that switches on with LOW.
- Set Buzzer to Passive (piezo) or Active, to match yours.
- Press Install on Arduino and confirm. It takes about 20 seconds; Beacon reads every byte back to check it.
- Turn on Send status to Arduino. Leave Port on Auto-detect — genuine Unos and CH340 clones are both found.
Test it without firing the laser
Beacon has a test mode: in Settings, press the test buttons (Running, Paused, Framing, Ready) and watch the light follow, or run the 10-second test job. Nothing is sent to LightBurn or the laser.
Going further
- Relays: up to nine relay buttons (pins D2, D3, D5–D7, D11–D13 and A0) for an exhaust fan, air assist or lights — switched by hand, with the job, or on a schedule.
- Sensors: a flame sensor (A2), temperature sensor (A3), lid switch (A4) and exhaust or coolant flow switch (A5). The board sounds the fire alarm by itself, even with the PC off.
- Wi-Fi instead of USB: an ESP32 runs the same light over your 2.4 GHz Wi-Fi. It's set up once with the Arduino IDE; the full steps are in the hardware guide.